
How to Pin Back Ears Without Surgery: Your Complete Guide
About 5% of the population has prominent ears, according to clinical estimates. If you are one of them, you have probably wondered whether there is a way to pin back your ears without going through surgery. The answer is yes. Non-surgical ear correction has come a long way in recent years, with adhesive correctors, medical tape, and other at-home techniques offering real cosmetic results without incisions, anesthesia, or recovery time.
This guide covers every non-surgical method available for pinning back ears, from quick temporary fixes to long-lasting adhesive correctors. We will break down how each method works, its pros and cons, realistic expectations, and when surgery might actually be the better path. Whether you are an adult looking for a confidence boost or a parent exploring gentle options for your baby, you will find practical, evidence-based information here.
Understanding Prominent Ears: Causes and Who Is Affected
Prominent ears (also called protruding ears) are typically defined as ears that extend more than 2 centimeters from the side of the head, or where the angle between the ear and the skull exceeds 35 degrees. This is a congenital trait determined largely by genetics. It is not a medical problem, but it can affect self-confidence, particularly in children.
A Finnish study on otoplasty trends found that nearly 79% of surgical ear corrections involved both ears, confirming that bilateral prominence is the most common presentation. The psychological impact is well-documented too. A 2019 NHS review noted that psychological distress was a contributing factor in up to 53% of otoplasty referrals, with many families seeking temporary fixes first to avoid the commitment of surgery.
Understanding the cause matters because it shapes your options. In adults, the ear cartilage is fully formed and set, which means non-surgical methods provide a cosmetic (temporary) effect. In infants under six months, the cartilage is still remarkably soft and pliable, which creates a unique window where gentle external correction can sometimes produce lasting changes.
Non-Surgical Methods to Pin Back Ears: A Complete Comparison
There are several approaches to non-surgical ear pinning, ranging from purpose-built adhesive correctors to everyday styling tricks. Here is how they compare on the factors that matter most.
| Method | Best For | Duration | Visibility | Cost | Key Limitation |
|---|---|---|---|---|---|
| Adhesive ear correctors | Daily wear, events, photos | 3-7 days per application | Nearly invisible | $15-30 per pack | Temporary cosmetic effect in adults |
| Medical tape | Quick fix for a few hours | A few hours | Often visible | Under $10 | Not designed for ear correction; can irritate skin |
| Headbands and hats | Casual wear, sports | While worn | Visible (but fashionable) | Varies | Only conceals, does not reposition ears |
| Hairstyling | Short-term concealment | Until hair is restyled | Natural (but limits style choices) | Free | Does not work for updos, swimming, or windy conditions |
| Ear clips / clip-on earrings | Brief social events | A few hours | Somewhat visible | $5-20 | Uncomfortable with extended wear; not discreet |
Each method has its place, but they are not equally effective. Let's look at each one in detail.
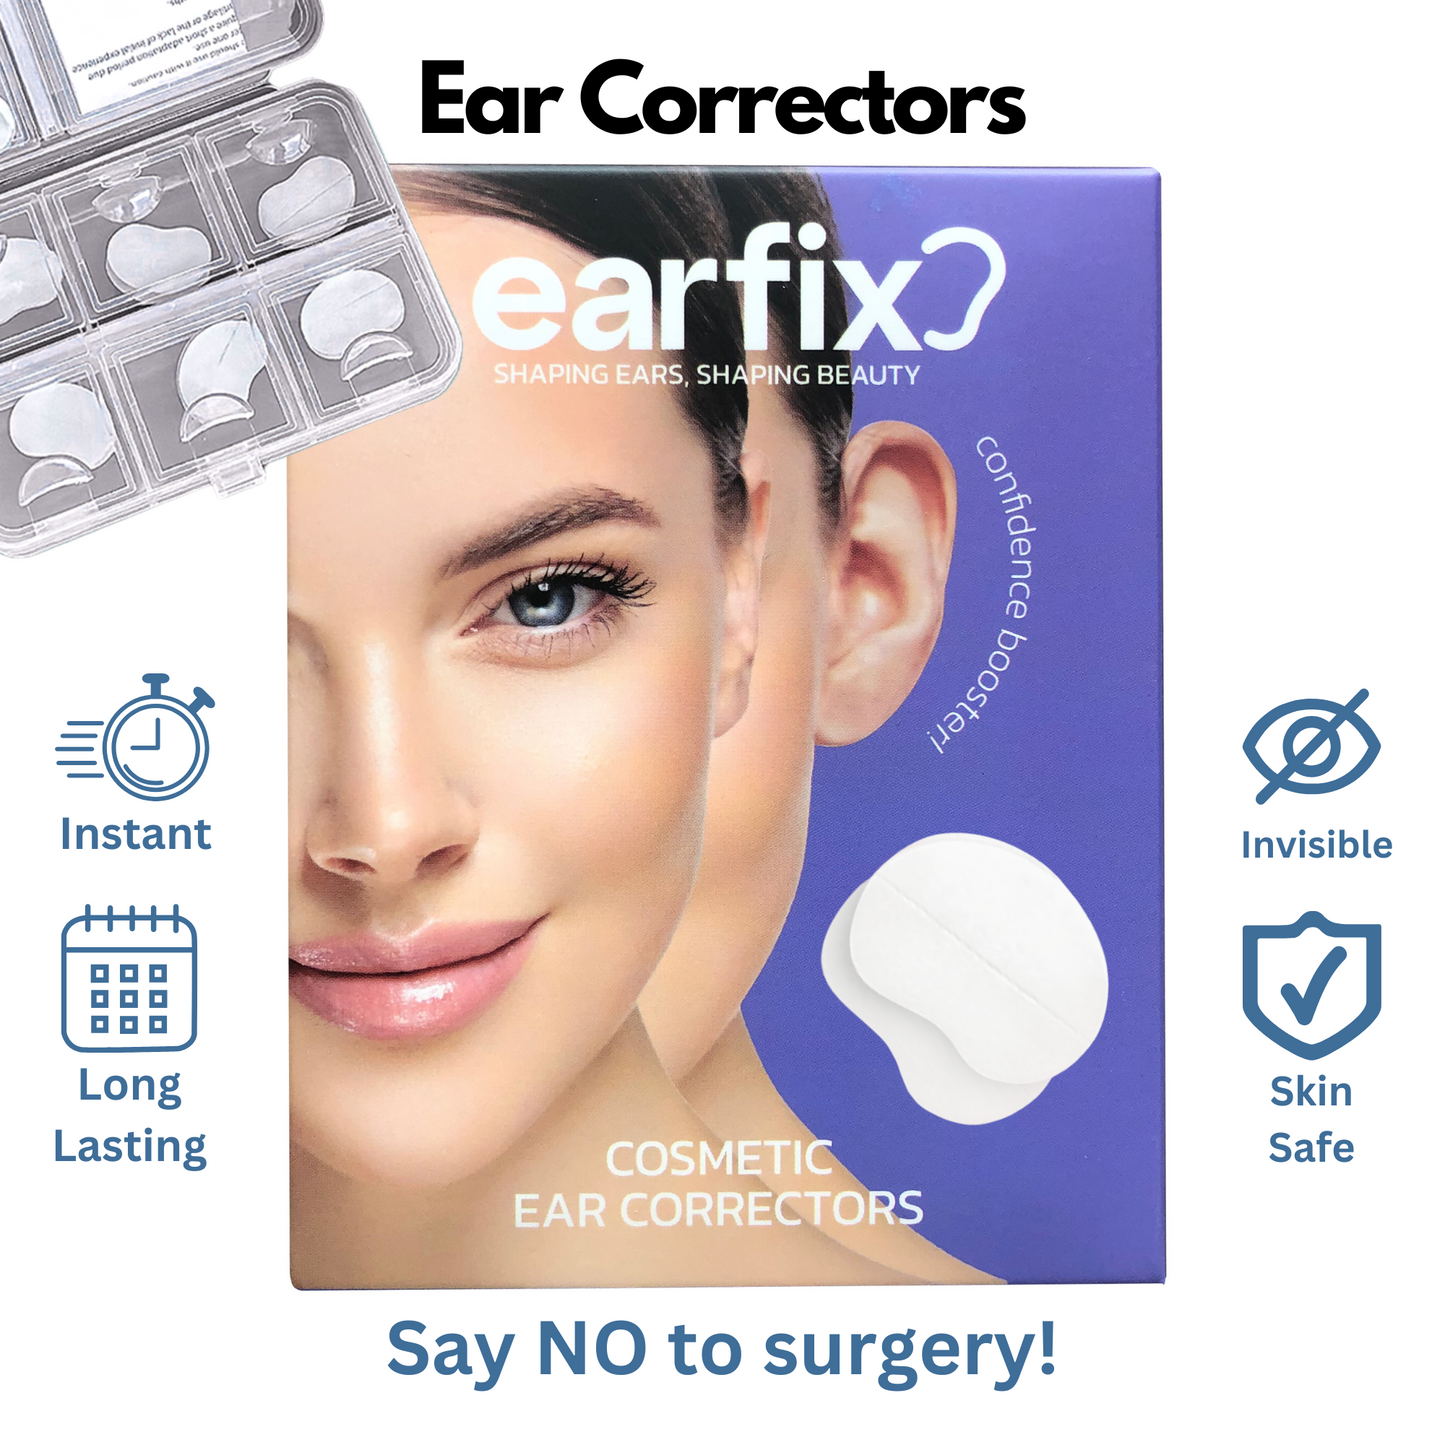
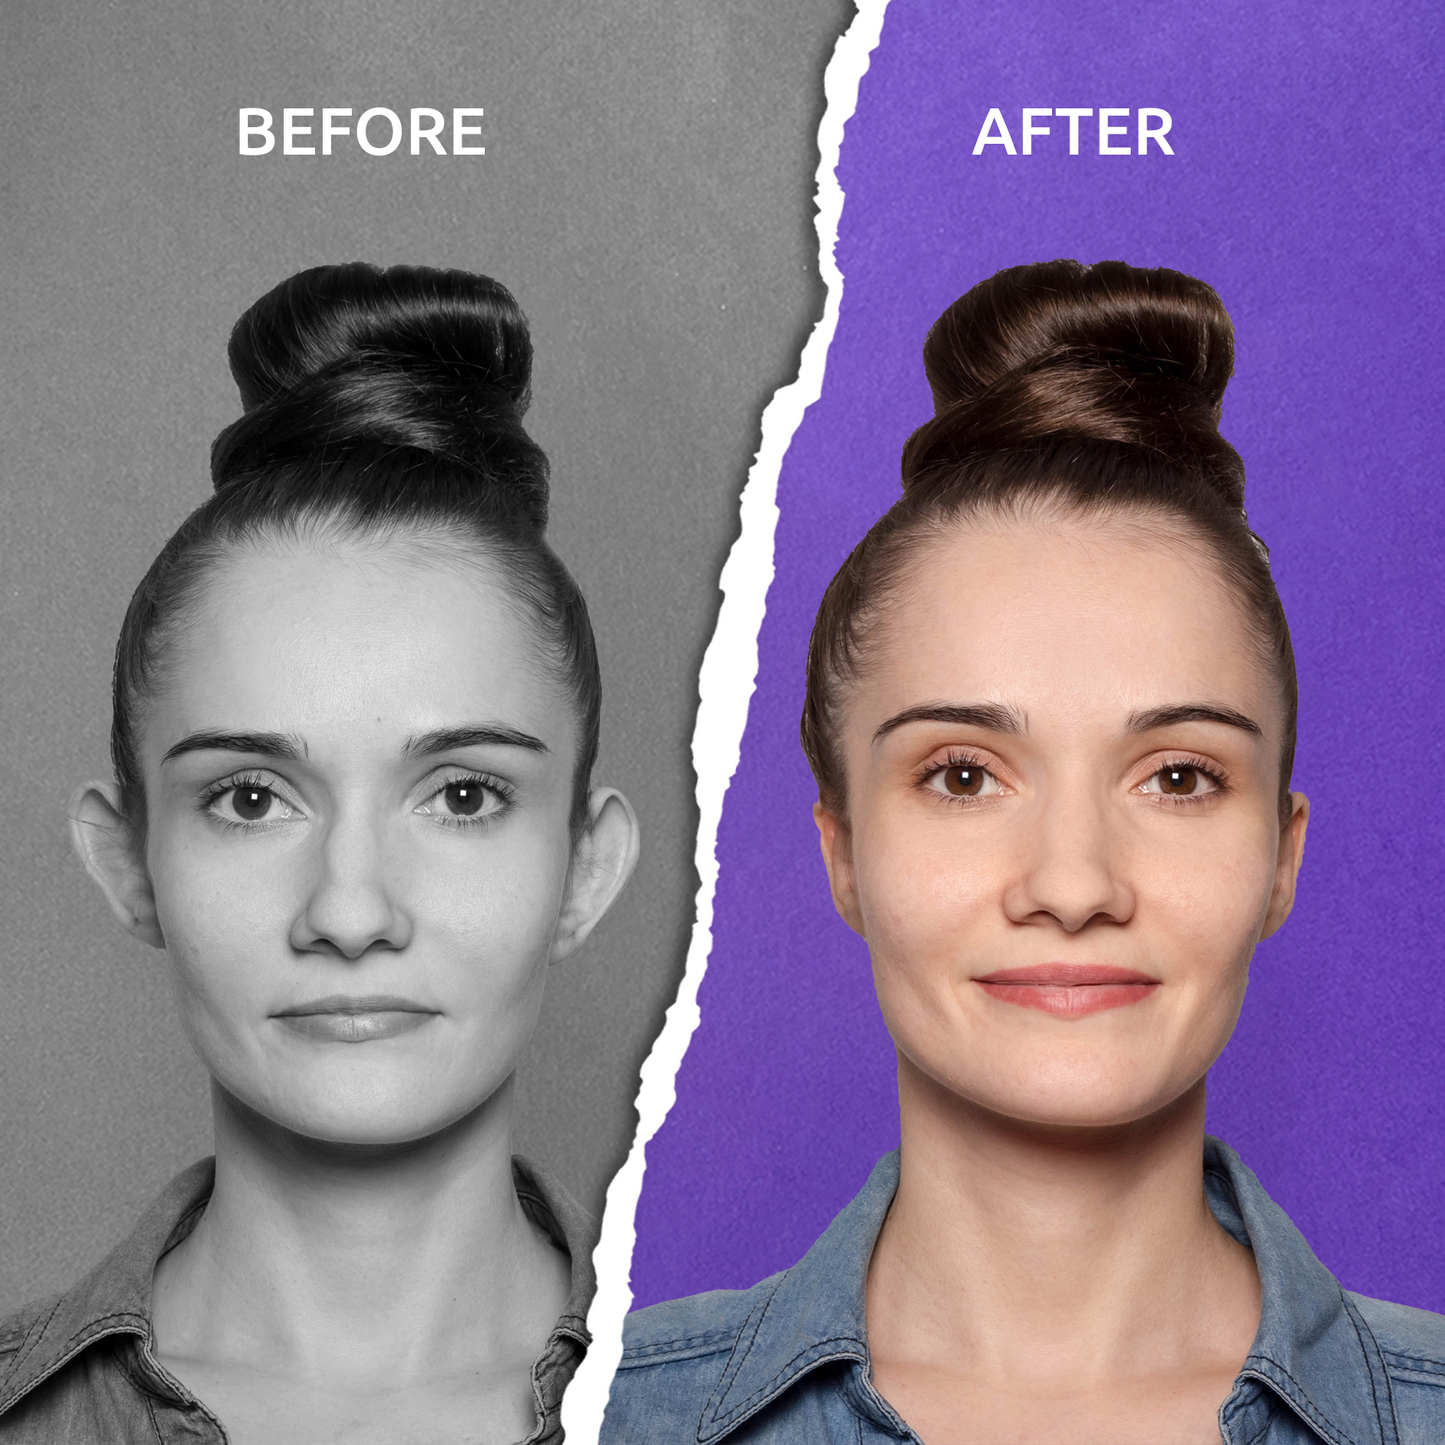
Adhesive Ear Correctors: How They Work

Adhesive ear correctors are the most popular non-surgical option for a reason. They are small, transparent silicone patches with medical-grade adhesive on both sides. You stick one side to the back of your ear and the other to the skin on your head. This creates enough gentle tension to hold the ear closer, producing an immediate pinned-back appearance.
Products in this category (including EarFix, Otostick, and similar brands) typically share these characteristics:
- Medical-grade silicone: Biocompatible material designed for extended skin contact without irritation.
- Hypoallergenic adhesive: Dermatologist-tested formulas that minimize allergic reactions, even on sensitive skin.
- Water and sweat resistance: Most quality correctors hold through showers, workouts, and swimming.
- Multi-day wear: A single application typically lasts 3 to 7 days depending on skin type and activity level.
The global ear correction market reflects how widely these products have been adopted. The global otoplasty market was valued at approximately USD 378.5 million in 2025 and is projected to more than double by 2032, with non-surgical segments growing fastest. The shift toward non-invasive options is driven by their minimal risk, quick results, and affordability compared to surgical alternatives.
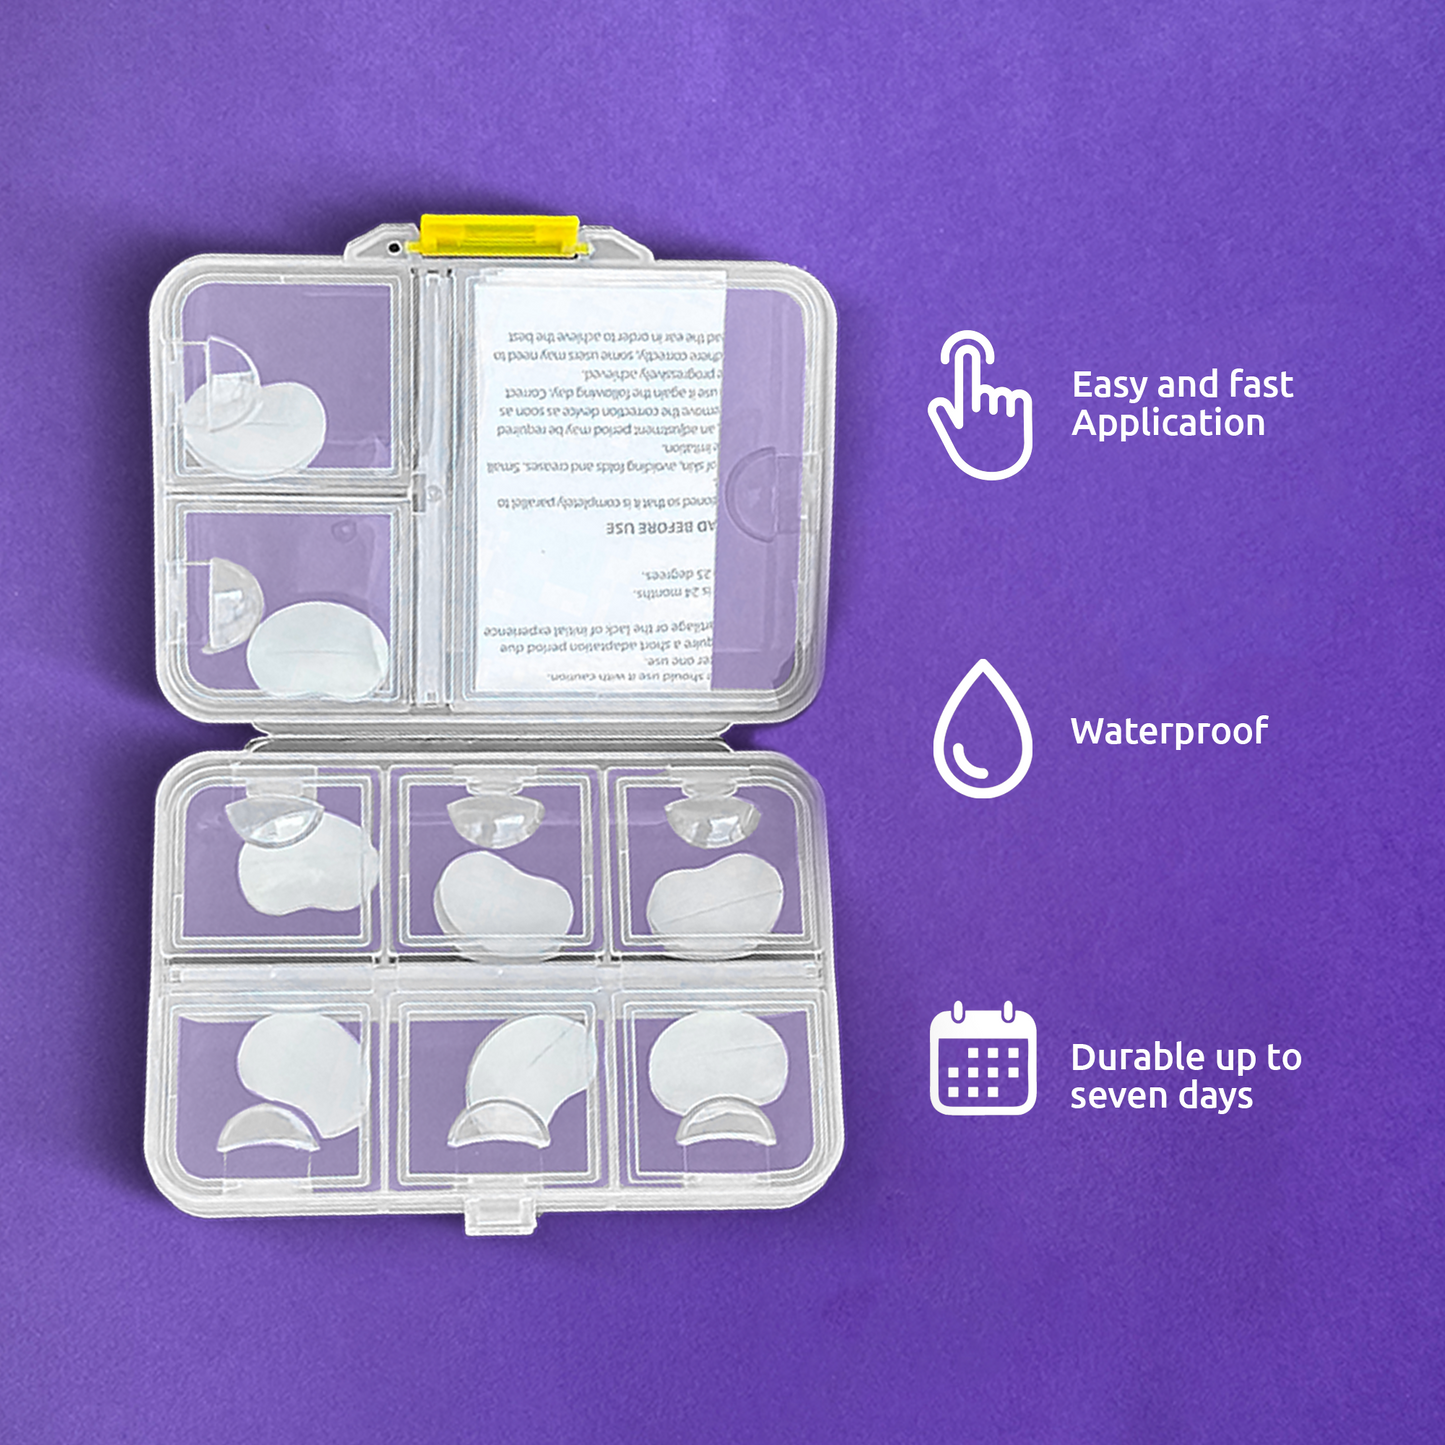
Step-by-Step Application Guide
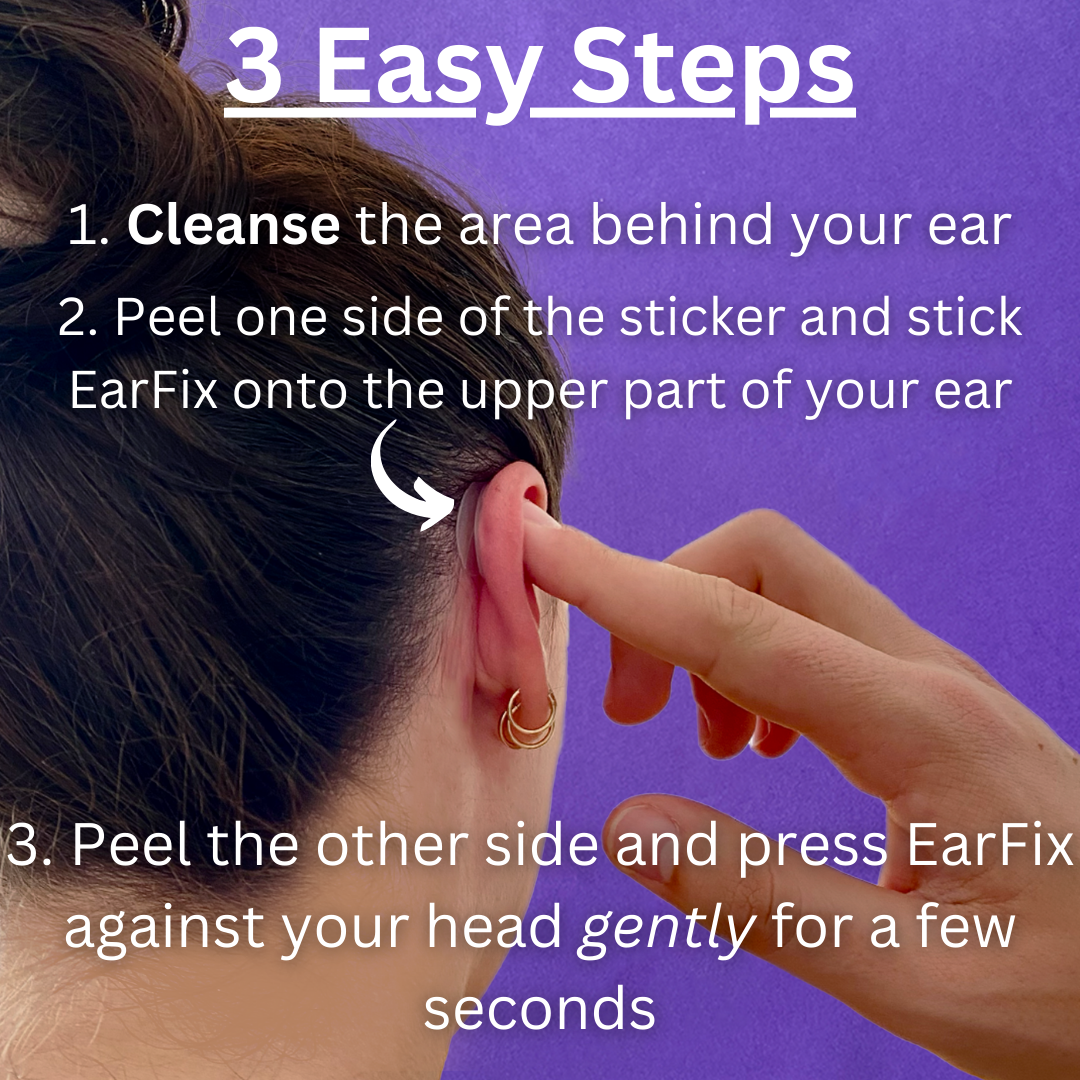
Getting a secure, invisible hold depends almost entirely on proper application technique. Here is the process:
- Clean the skin thoroughly. Use an alcohol wipe or oil-free cleanser on the skin behind your ear and the matching spot on your head. Natural oils, lotions, and moisturizers are the number one reason correctors do not stick properly.
- Dry completely. Pat the area dry and wait a moment. Even slight moisture will weaken the adhesive bond.
- Do a dry run. Before peeling the backing, hold the corrector in place and gently press your ear back. Find the position that looks natural and feels comfortable. Every ear is different, so the ideal placement may be slightly higher or lower than you expect.
- Peel one side and attach to your ear. Remove the protective paper from one side and press the adhesive firmly to the back of your ear. Avoid touching the sticky surface with your fingers.
- Secure to your head. Peel the second side, gently press your ear back into position, and stick the corrector to your scalp skin. Hold for 30 to 60 seconds with firm pressure.
- Avoid water for the first hour. Give the adhesive time to fully bond before showering, exercising, or swimming.
Tips for Longer Wear
- Handle correctors by the edges only. Finger oils weaken adhesive.
- Check for stray hairs under the patch, which can cause lifting.
- Use a silk or satin pillowcase to reduce friction while sleeping.
- Apply hair products and lotions before placing the corrector, not after.
- Give your skin a few hours of rest between applications to maintain skin health.
- For removal, dab baby oil around the edges to dissolve the adhesive gently.
Medical Tape: The Budget Option (and Its Drawbacks)
Using medical or surgical tape to pin back ears is probably the oldest DIY approach. The concept is straightforward: tape the ear to the side of the head. It is cheap and widely available, which makes it appealing for a one-time event or a quick test of what pinned-back ears might look like.
However, there are real drawbacks to using tape regularly:
- Visibility: Most medical tapes are opaque or have a visible sheen. They are difficult to hide, especially with short hair or updos.
- Comfort: Standard tapes lack the ergonomic shape needed to follow the ear's contour, leading to wrinkling, pulling, and discomfort.
- Skin irritation: General-purpose adhesives are not formulated for the delicate skin behind the ears. Repeated use can cause redness, rashes, and contact dermatitis.
- Short duration: Tape typically loosens within hours, especially with any moisture or movement.
Medical tape can work in a pinch for a quick photo, but for regular use, purpose-built adhesive correctors are a significant upgrade in comfort, durability, and discretion. For a deeper look, see our post on the pros and cons of ear pinning tape.
Hairstyles, Headbands, and Other Concealment Methods
Styling your hair to cover your ears requires no products at all, which makes it the most accessible option. Hairstyles with volume on the sides, side-swept bangs, or strategically placed layers can effectively minimize the appearance of prominent ears.
Headbands, hats, and beanies offer another layer of concealment and can be fashionable in their own right. For casual settings or sports, they are a perfectly valid choice.
The limitation is obvious: these methods depend entirely on your hairstyle staying in place. They do not help when you want to wear your hair up, go swimming, face a windy day, or simply stop thinking about your ears. They conceal rather than reposition, which is an important distinction. For more styling ideas, check out our guide to hairstyles for protruding ears.
Ear Correction for Babies and Infants
Ear correction in infants is fundamentally different from adult correction, and it deserves its own section. A baby's ear cartilage remains soft and pliable for the first several months of life due to circulating maternal estrogen. This creates a genuine window of opportunity for gentle, external correction that can produce lasting results.
How Infant Ear Molding Works
Ear molding (also called ear splinting) uses custom-fitted molds or gentle adhesive systems to softly reshape the ear's cartilage while it is still malleable. This method has been used in clinical settings for decades and is gaining wider attention as a non-invasive alternative to future surgery.
The clinical evidence is encouraging. Research has shown that ear splinting can achieve a good-to-fair correction in up to 86% of treated children, with parent satisfaction rates as high as 100% when treatment begins within the first few weeks of life. The earlier treatment starts, the better the results tend to be, since the cartilage becomes progressively firmer with age.
At-Home Options for Parents
Products designed as baby ear correctors (such as EarFix for Babies) make professional ear-molding principles accessible at home. These use softer adhesives specifically formulated for infant skin, which is far more delicate than adult skin.
Key points for parents considering at-home infant ear correction:
- Start early. The ideal window is within the first few months, while cartilage is most responsive.
- Prioritize safety. Use only products specifically designed for infants, with dermatologist-tested, hypoallergenic, latex-free materials.
- Keep skin clean and dry before application for the best adhesion.
- Monitor skin daily. Check for any redness or irritation and give the skin breathing room between applications.
- Be consistent. Regular wear during the malleable period gives the best chance of a lasting cosmetic improvement.
This approach can help parents take a proactive step rather than adopting a "wait and see" approach, potentially preventing self-consciousness and more invasive procedures later in childhood.
When to Consider Surgery Instead
Non-surgical methods are excellent for cosmetic improvement, but they are not a replacement for surgery in every case. It is important to be honest about what each approach can and cannot do.
Otoplasty: What It Involves
Otoplasty is a surgical procedure where a surgeon makes an incision (usually behind the ear), reshapes the cartilage, and uses permanent internal stitches to hold the ear in its new position. It is performed under local or general anesthesia and typically takes 1 to 2 hours. The International Society of Aesthetic Plastic Surgery reported approximately 327,990 ear surgeries globally in 2023, making it one of the more common cosmetic procedures worldwide.
Recovery involves wearing a compression dressing for several days, followed by a supportive headband for 1 to 2 weeks. Most patients need 5 to 7 days before returning to work or school. Swelling, tenderness, and activity restrictions can persist for several weeks.
Surgery vs. Non-Surgical: Honest Comparison
| Factor | Adhesive Correctors | Otoplasty Surgery |
|---|---|---|
| Results | Immediate cosmetic change; temporary for adults | Permanent structural change after healing |
| Pain | None | Post-operative discomfort for days to weeks |
| Recovery | Zero downtime | 5-7 days minimum; full healing takes weeks |
| Cost | $15-30 per pack | $5,000-$10,000+ (rarely covered by insurance) |
| Risks | Minor skin irritation (rare) | Infection, scarring, asymmetry, anesthesia risks |
| Reversibility | Fully reversible | Permanent |
| Best for | Daily confidence, events, trying the look first | Permanent correction of severe prominence |
When Surgery Makes More Sense
Consider otoplasty if:
- You want a permanent, one-time solution and are comfortable with a medical procedure.
- The degree of ear prominence is severe and non-surgical methods do not achieve the result you want.
- You have tried adhesive correctors and decided you would prefer not to reapply them regularly.
- A doctor has identified a structural issue (such as a missing antihelical fold) that correctors cannot address.
For most people whose goal is a cosmetic improvement for daily confidence, photos, or special events, non-surgical correctors offer a practical first step. Many people try correctors before committing to surgery, which lets them preview the result at minimal cost and zero risk.
Real-World Tips for Daily Confidence
Using non-surgical ear correction is most effective when it fits seamlessly into your routine. Here are practical tips from experienced users:
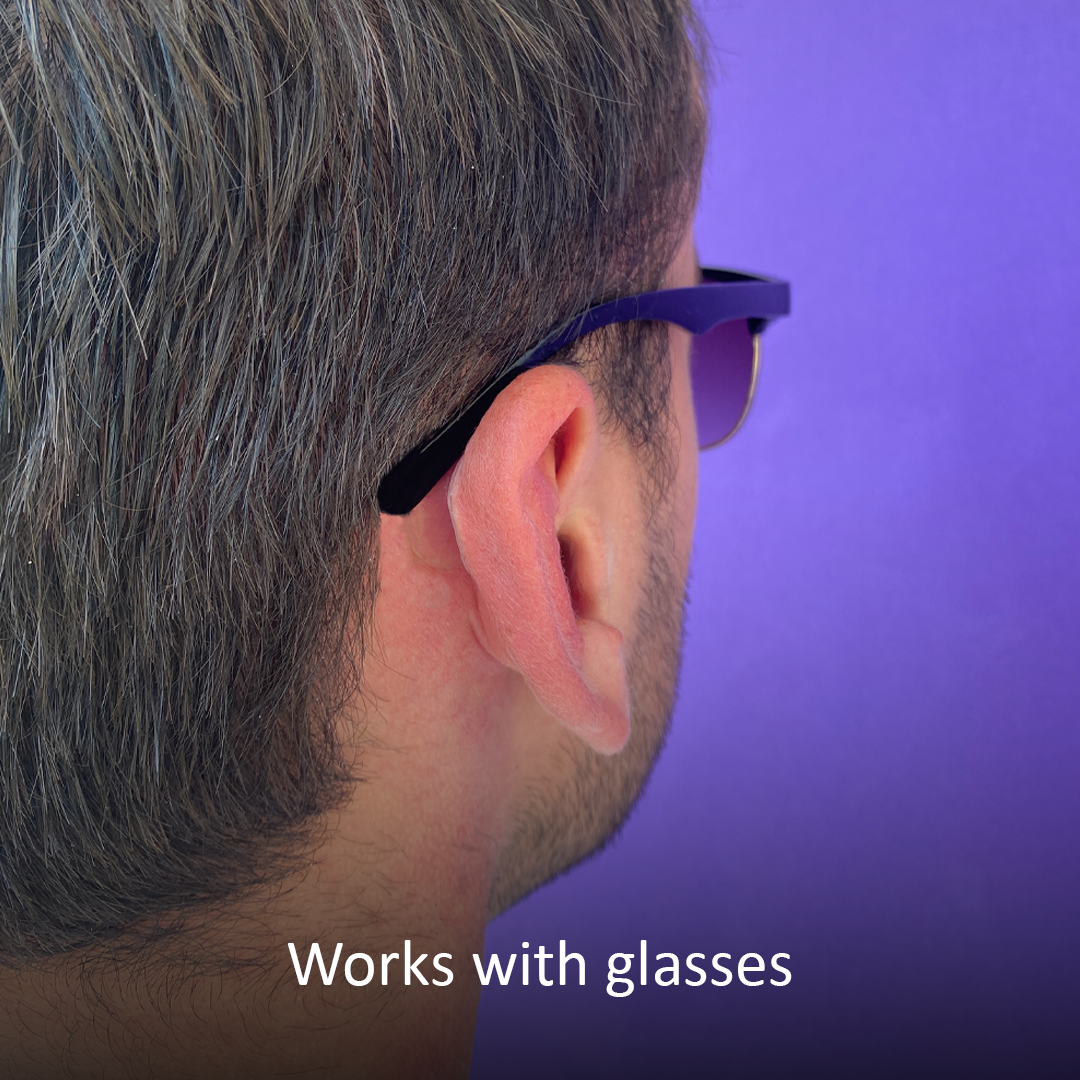
- For glasses wearers: Apply the corrector first, then put on your glasses. The slim profile sits flat and will not interfere with frames.
- For sleeping: The soft silicone is comfortable enough to sleep in. A silk pillowcase reduces friction and extends wear time.
- For workouts: Apply at least one hour before exercise to let the adhesive fully bond. Quality correctors like EarFix are sweat-proof and water-resistant.
- For photography: Apply correctors the night before an event so the adhesive is fully set. This eliminates any chance of edges lifting during photos.
- For hair styling: Correctors work with any hairstyle. Wear your hair up, down, in a ponytail, or in an updo. The transparent silicone is invisible from any angle.
Troubleshooting Common Issues
If you experience edges lifting, it is almost always a skin preparation issue. Clean the area again, ensure it is fully dry, and apply a fresh corrector with firm pressure for 60 seconds. If you notice minor redness after removal, let your skin rest for 24 hours before the next application. Rotating the exact placement slightly with each new application helps prevent concentrated pressure on one spot.
Frequently Asked Questions
How long do adhesive ear correctors last per application?
Most quality adhesive ear correctors last between 3 and 7 days per application. The exact duration depends on your skin type (oily skin may shorten wear time), activity level, and climate. Humidity and frequent water exposure can also affect adhesion. For the longest wear, ensure the skin is completely clean and dry before application, and avoid touching the adhesive surface during setup.
Are non-surgical ear correctors safe for babies?
Yes, when you use products specifically designed for infants. Baby ear correctors use gentler adhesives and softer materials formulated for delicate infant skin. Look for products that are dermatologist-tested, hypoallergenic, and latex-free. Always monitor the skin daily for any signs of irritation, and give the skin a rest period between applications. Do not use adult-formulated correctors on babies.
Will wearing ear correctors permanently change my ears?
For adults, no. Adult ear cartilage is fully formed and rigid, so adhesive correctors provide an immediate cosmetic effect that lasts as long as the corrector is worn. For infants under six months, consistent use during the period when cartilage is still soft and pliable can sometimes guide the ear into a more typical position with lasting results. However, permanent outcomes in infants are not guaranteed and depend on factors like the age when correction begins and the consistency of use.
Can I swim, exercise, and shower while wearing ear correctors?
Yes. Quality correctors made from medical-grade silicone with waterproof adhesive are designed to withstand showers, swimming, workouts, and sweating. The key is to apply the corrector at least one hour before water exposure or intense activity, giving the adhesive time to fully bond. After getting wet, gently pat the area dry rather than rubbing. Avoid directing high-pressure water streams directly onto the corrector.
How much does otoplasty cost compared to non-surgical alternatives?
Otoplasty typically costs between $5,000 and $10,000 in the United States, including surgeon fees, anesthesia, and facility costs. It is almost always classified as cosmetic and not covered by insurance. Non-surgical adhesive correctors cost roughly $15 to $30 per pack, with each pack lasting several weeks. Over the course of a year, non-surgical correction costs a small fraction of what a single surgical procedure costs.
Are there any risks to using ear correction stickers daily?
The primary risk is minor skin irritation, which is uncommon when using dermatologist-tested, hypoallergenic products on clean skin. To minimize this risk, always apply to clean, dry skin, give your skin periodic rest between applications (a few hours is sufficient), and rotate placement slightly. If you experience persistent redness or discomfort, discontinue use and consult a dermatologist. Compared to surgical risks (infection, scarring, anesthesia complications), the risk profile of adhesive correctors is very low.